As my readers know I presently study how to work with background jobs for plot and information updates in Jupyterlab. The reason for this endeavor is that I want to organize my work with ML- training and long evaluation runs a bit differently in the future. In particular I want to have the freedom of working in other regions (other cells) of a Python3 notebook while the long running jobs do their work in the background. This includes that these other cells may also start major background jobs or run code in parallel to the background tasks.
After some experiments I think that for my particular purposes a combination of QTAgg, Matplotlib and PyQt provides the best solution.
What I like about PyQt is its very clear structure. And you can use QTextEdit-widgets as a kind of canvas for print output. And e special Figure-widget for Matplotlib. Using PyQt opens up for many new options to build nice application windows around your ML-algorithms on your Linux desktop. Which will be extremely valuable for presentations or customer end applications.
In this post series I will present a few test applications that cover a lot of topics around Qt-widgets, widget- communication, threads, signals and events. We will start with a simple foreground application. Then we turn to threads and signals between threads. Afterward we integrate Matplotlib and deepen our understanding of handling threads in PyQt applications for Matplotlib and print output.
Objectives of this post
This first post translates a question posed at Stackoverflow [1] into a more complex example. With it I want to show
- how to set up your own PyQt application in a Jupyterlab (Python) environment and display it directly as a Qt-window on your desktop,
- how to create a nested PyQt “sub-window”-structure with the help of a PyQt-window layout,
- how to react to events,
- how to give a central widget its own paintEvent and a painter for drawing graphical primitives,
- how to “hide” a widget element,
- how you control which of your graphical primitives is drawn and which not.
This application does not yet use background jobs. So, due to its present structure it will block running any Python code in other notebook cells while we have some action going on in the application’s PyQt-widgets.
We are going to change this during the course of this post series. For the time being my main objective is only to show that PyQt can be used at all with QtAgg in Jupyterlab notebooks.
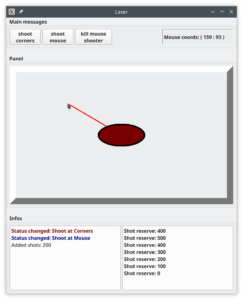
My “application” is a bit stupid in so far as 2 main button only trigger a continuous dynamic painting of a red line from a sub-window’s center to the mouse pointer or to the corners of their surrounding sub-window areas. It is simple and trivial, but it nevertheless gave me some fun constructing it.
If you like, you may think of the red line a “laser beam” shooting at the mouse pointer or the frame corners. I will use this term below when I discuss the functionality. There is also a video link at the end of the post.
All of this has obviously nothing to do with ML, yet, but it gives you a feeling how we can compose PyQt applications in a Jupyterlab environment. In other posts of this blog we will use our acquired PyQt knowledge to put Keras based ML-machinery into our own graphical interfaces on the Linux desktop. I.e. outside the browser tab for Jupyterlab.
Level of this post: In parts advanced. Not because the example is so complicated. Nevertheless some background information on Qt-Window layouts and Widgets is required. Good introductions are given here. Details for all Qt-widgets that I use below can be found at https://wiki.qt.io/.
But note: For a Jupyterlab Python notebook with an QtAgg-backend you do not need the whole app.exec() stuff described in the tutorial examples.
Yes, you can use PyQt from Jupyterlab
Most ML-developers who use Jupyterlab may have come across Qt in the context of Matplotlib. Matplotlib abstracts a lot from the specifics of its many supported backends. Therefore, many of these users may not have realized that the so called QtAgg backend for Matplotlib actually is not only suited for Matplotlib purposes. Instead it prepares all we need to use our IPython environment for creating and showing PyQt-based widgets and Qt-based application windows on our desktop, too.
The preparatory steps include the initialization of a “QtWidgets.QApplication”-instance ([2], [3]) with sets up the required main event-loop for handling Qt-GUI-events and related event handling functions. Such events are on the one hand triggered by user interactions (mouse and keyboard) with Qt-window elements (widgets). But the event handling, of course, also includes events, which directly trigger the redrawing of Qt-window elements, namely widgets. Such updates of the window contents can be requested from Python code. Actually, in a QtAgg environment, Matplotlib figures are handled in the form of a special PyQt-widget. As I will show, we can use the established Qt main event loop of QtAgg not only for displaying Matplotlib figures in Qt-windows, but also for a event-monitoring and updating of other PyQt-GUI-widgets. We compose and display such with the help of PyQt tools.
The best feature of QtAgg is that the additionally necessary integration with IPython’s prompt handling for notebook cells is already done for us, too: The main Qt event loop is intermittently turned on to read and dispatch events to connected (Python) callbacks when the IPython-loop for REPL-input (i.e. prompt input at a cell) is idle. So, as long we do not block the main event loop by occupying the Python interpreter with some own and very long lasting Python code (in a notebook cell or in a callback), previously started Qt-GUI elements (on the desktop) may remain (relatively) responsive. (I will describe the integration in more details in another post of this blog.) Unfortunately and as said already: The application we will build below has a long loop at its center which will block code execution in other notebook cells.
Dynamic PyQt windows
Matplotlib users may have experienced that they may need the Matplotlib-command figure.canvas.flush_events() to trigger a display of figure- and ax-changes during long running codes for dynamic Matplot-figures. This can happen with PyQt-windows, too. The corresponding command there is:
QtWidgets.QApplication.processEvents()
Actually, canvas.flush_events() calls this function when Matplotlib uses QtAgg as a backend. We will use processEvents multiple times in our first PyQt-application.
A simple PyQt-example based on Qt-widgets and a basic vertical layout
We build a main window to systematically integrate the following elements:
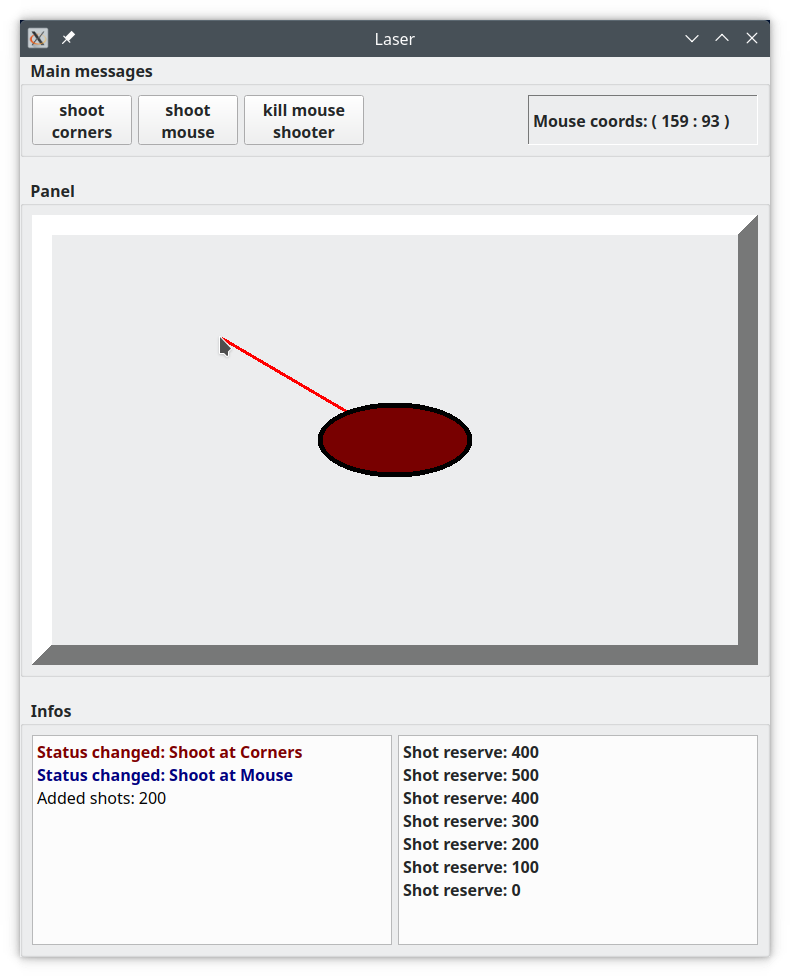
- A row (with fixed height) at the top with three buttons and an information area for the mouse position inside a panel
- A dynamically resizing panel appearing raised above the background – this is where the “action” takes place. At the center we place an ellipse which does the shooting.
- An info area (with fixed height) which displays information coming from intermediate output-commands.
Walk through the code
The cell numbering follows the sequence given in a PDF provided for the total code at the bottom of this post. However, we walk through the code in a changed order.
Cell 1 – Imports
We first t need some imports:
import time
import gc  # need some garbage collection
import sys # for PyQt5
import numpy as np
import queue


import matplotlib.backends
import matplotlib.pyplot as plt
from matplotlib.figure import Figure

#from PyQt5.QtWidgets import QApplication,QWidget
from PyQt5 import QtWidgets, QtCore
from PyQt5.QtCore import QSize, Qt, QLine, QPoint
from PyQt5.QtGui import QPainter, QPen, QBrush, QFont, QColor
from PyQt5.QtGui import QTextCursor
from PyQt5.QtWidgets import QMainWindow, QWidget, QGridLayout
from PyQt5.QtWidgets import QPushButton, QLabel, QGroupBox
from PyQt5.QtWidgets import QVBoxLayout, QHBoxLayout
from PyQt5.QtWidgets import QFrame, QSizePolicy, QTextEdit
Note that loading “matplotlib.pyplot” is required! “matplotlib.backends” alone is not enough, even if you do not open any Matplotlib figure.
Cell 2 – Activate the backend
We need the backend to integrate Qt (including the main event loop) into our IPython environment. Do not forget the statement below when working with PyQt in IPython environments! Otherwise the notebook’s IPython-kernel will crash already when you start to build your PyQt-windows.
matplotlib.use('QtAgg')
Note: QtAgg is enough. It decides on its own whether we have Qt5 or Qt6 available. You do not need to qualify Qt5 as e.g. in Qt5Agg. Though Qt5Agg will work, too.
Cell 5 – Class MainWindow: A class for a Qt-window on the desktop
The code for a main window class “MainWin” will become relatively long. I split it into sections. You will have to scroll most of the code areas below nevertheless. When you copy the code of functions watch out to which class they belong and integrate them at the right place.
We are going to build a cascade of nested widgets. Whenever a widget contains inner “child” widgets I will call such a container widget a “parent” relative to its child widgets. To distinguish this from parent-classes we name variables with references to parent widgets “parentW” below. E.g. when used as function arguments.
class MainWindow(QtWidgets.QMainWindow):

    def __init__(self, shoot_interval
                 , num_shoot_iterations = 401
                 , plus_iterations = 200):
        QtWidgets.QMainWindow.__init__(self)

        self.setWindowTitle("Laser")

        # Parameters (transfer to child objects)
        # ~~~~~~~~~~~
        # timer for "laser beam" blinking
        self.beam_time_interval = shoot_interval
        # num of laser shots
        self.num_shoot_iterations = num_shoot_iterations
        self.plus_iterations = plus_iterations

        # Main inner window = Container (simple QWidget)
        # ~~~~~~~~~~~~~~~~~~
        self.inner_win = QtWidgets.QWidget()
        self.setCentralWidget(self.inner_win)

        self.inwin_layout = QtWidgets.QVBoxLayout()
        self.inner_win.setLayout(self.inwin_layout)
        self.inwin_layout.setContentsMargins(0,0,0,0)
        self.inwin_layout.setSpacing(20)

        # Set initial size of the Qt-window
        # ~~~~~~~~~~~~~~~~
        self.resize(750, 900)

        # Preparations for contents
        # ~~~~~~~~~~~~~~~~~~~~~~~~~~~
        # just for admin purposes
        self.d_mywidgets = {}
        # colors
        self.col_red = QColor('red')
        self.col_darkred = QColor(125, 0, 0)
        self.col_darkblue = QColor(0, 0, 125)
        self.col_darkgreen = QColor(0, 125, 0)
        self.col_black = QColor(3,3,3)

        # Create contents in the central widget
        # ~~~~~~~~~~~~~~~~~~~~~~~~~~~~~~~~~~~~~
        self.create_window_contents()

        # no mouse-tracking required on this level
        self.setMouseTracking(False)

        # show() (non-blocking for notebook cells)
        # ~~~~~~
        # (this is not Matplotlibs plt.show)
        self.show()


        ....
Our main window shall become a Qt-window on the desktop. Therefore its class must be derived from QtWidgets.QMainWindow. We must apply the constructor of the parent-class as our first step.
Regarding the nested widget construction I always prefer to first set a general centralized widget as an inner window [5]. It (“inner_win”) will serve as a container for further widgets. For many PyQt widgets we can choose a basic layout structure for the arrangement of its content elements. In our case I use a vertical standard layout (QtWidgets.QVBoxLayout, with zero margins and some clear spacing between its rows).
Then we set the size of the main window. And do some other preparatory steps. Note that the final show()-command, which will bring the main window to the desktop screen, is non-blocking for other notebook cells. In contrast to Matplotlib’s plt.show().
Cell 5 – Class MainWindow: Vertical layout and content elements
We are going to fill 3 rows of our vertical layout with grouping boxes (derived from QGroupBox). The first box, groupbox1, will contain
- 3 PushButtons (but_shoot_corners, but_shoot_mouse, but_kill_mouse)
- and a passive text label (mouse_label, as an instance of QLabel) to indicate the mouse position when the mouse enters the panel in the second row.
Groupboxes allow also for giving the vertical sections a name, which will be displayed.
class MainWindow(QtWidgets.QMainWindow):
    def __init__(self, shoot_interval, ...):
        ....
        ....
    # Fill the central widget with contents
    # ~~~~~~~~~~~~~~~~~~~~~~~~~~~~~~~~~~~~
    def create_window_contents(self):

        # A groupbox for multiple buttons
        # ~~~~~~~~~~~~~~~~~~~~~~~~~~~~~~~
        self.groupbox1 = QGroupBox("  Main messages")
        self.groupbox1.setStyleSheet('font-weight:bold;')
        self.groupbox1.setFixedHeight(100)
        self.inwin_layout.addWidget(self.groupbox1)
        self.vbox1 = QHBoxLayout()
        self.groupbox1.setLayout(self.vbox1)

        # 1-st button: shoot beam periodically at panel's corners
        self.but_shoot_corners = QPushButton('shoot\ncorners', self)
        #self.but_shoot_corners.setMinimumWidth = 100
        self.but_shoot_corners.setMinimumSize(QSize(100, 50))
        sizePolicy_but = QSizePolicy(QSizePolicy.Maximum, QSizePolicy.Maximum)
        self.but_shoot_corners.setSizePolicy(sizePolicy_but)
        self.vbox1.addWidget(self.but_shoot_corners)

        # 2-nd button: Shoot beam at mouse pointer position
        self.but_shoot_mouse = QPushButton('shoot\nmouse', self)
        #self.but_shoot_corners.setMinimumWidth = 100
        self.but_shoot_mouse.setMinimumSize(QSize(100, 50))
        sizePolicy_but = QSizePolicy(QSizePolicy.Maximum, QSizePolicy.Maximum)
        self.but_shoot_mouse.setSizePolicy(sizePolicy_but)
        self.vbox1.addWidget(self.but_shoot_mouse)

        # 3-rd button: Erase button 2 and ellipse
        self.but_kill_mouse = QPushButton('kill mouse\nshooter', self)
        #self.but_shoot_corners.setMinimumWidth = 100
        self.but_kill_mouse.setMinimumSize(QSize(120, 50))
        sizePolicy_but = QSizePolicy(QSizePolicy.Maximum, QSizePolicy.Maximum)
        self.but_kill_mouse.setSizePolicy(sizePolicy_but)
        self.vbox1.addWidget(self.but_kill_mouse)

        self.vbox1.insertStretch(3)

        # Text label to show mouse position inside panel
        self.mouse_label = QLabel(self) # provide self to the QFrame
        self.mouse_label.setFrameStyle(QFrame.Panel | QFrame.Sunken)
        #self.label.setText('Mouse coords: ( %d : %d )' % (event.x(), event.y()))
        self.mouse_label.setText('Mouse coords: ( %d : %d )' % (0.0, 0.0))
        self.mouse_label.setMinimumSize(QSize(230, 50))
        sizePolicy_label = QSizePolicy(QSizePolicy.Maximum, QSizePolicy.Maximum)
        self.mouse_label.setSizePolicy(sizePolicy_label)
        self.vbox1.addWidget(self.mouse_label)

        # self.inwin_layout.setStretchFactor(self.groupbox1, 1)

        # A (raised) Panel and Frame for action
        # ~~~~~~~~~~~~~~~~~~~~~~~~~~~~~~~~~~~~~~
        self.groupbox2 = QGroupBox("  Panel")
        self.groupbox2.setStyleSheet('font-weight:bold;')
        #self.groupbox2.resize(500,400)
        self.inwin_layout.addWidget(self.groupbox2)
        self.vbox2 = QVBoxLayout()
        self.groupbox2.setLayout(self.vbox2)

        # Initialize a Frame for an action panel - "self" is provided as parameter parentW
        # The frame will load and contain a panel
        self.frame1 = PanelFrame(self
                                  , self.beam_time_interval
                                  , num_shoot_iterations
                                  , plus_iterations)
        self.vbox2.addWidget(self.frame1)
        #self.inwin_layout.setStretchFactor(self.groupbox2, 4)

        # A groupbox Panel for info prints
        # ~~~~~~~~~~~~~~~~~~~~~~~~~~~~~~~~
        # Add a Qtext
        self.groupbox3 = QGroupBox("  Infos")
        self.groupbox3.setStyleSheet('font-weight:bold;')
        #self.groupbox2.resize(500,400)
        self.groupbox3.setFixedHeight(260)
        self.inwin_layout.addWidget(self.groupbox3)
        self.vbox3 = QHBoxLayout()
        self.groupbox3.setLayout(self.vbox3)
        self.textedit1 = QTextEdit()
        self.vbox3.addWidget(self.textedit1)
        self.textedit2 = QTextEdit()
        self.vbox3.addWidget(self.textedit2)
        self.textedit2.setFontWeight(QFont.Normal)
        self.textedit2.setTextColor(self.col_black)

        # Set button actions
        # ~~~~~~~~~~~~~~~~~~~
        self.bind_buts_to_callbacks()
    ....
    ....
For groupbox1 we, of course, choose a horizontal layout. We have to use some resizing policies and a stretching spacer at position 3 to keep the buttons on the left and the label on the right side of the row when we manually resize the window.
In addition we set the vertical height of groupbox1 to a fixed value. Otherwise the button area would expand when we resize the main window manually. For the buttons’ and the label’s functionality see below.
The second row, groupbox2, gets a more complicated layout. We want a framed area where the mouse is tracked. To make the area clearly visible we want the frame to simulate a 3D-raised effect. We will define a class for the frame and its contents below. “groupbox2” just get a vertical layout, but it contains only one element, namely an instance of a class “PanelFrame”. “groupbox2” (and its contents) will be stretchable and will adapt its size when we change the window size dynamically.
The third row, groupbox3, of our application will also get a horizontal layout. It contains two QTextEdit boxes, which will display intermediate status messages. In real ML-applications with Keras we would of course feed such sections with input coming from functions (callbacks) of our algorithms, e.g. during training or concrete runs.
We do not need any relative sizing and stretching factors for our rows as we also keep the last row at fixed height. Thus only the contents of the second “row” will adapt to window resizing.
At the end we call a function which will bind the buttons to certain actions. For the function code see below. Cell 3 will get more functions in the end, but to understand them we first need to understand what we do on the innermost panel of groupbox2.
Cell 4 – Class PanelFrame: A frame for an inner action panel
The best strategy with framed objects is that we first define a class for the frame, instantiate the class and then fill it with the contents to be framed. From cell 3 we know already that our class for the frame has the name “PanelFrame”. It is derived from the PyQt class QFrame. The code is rather simple.
class PanelFrame(QFrame):

    def __init__(self, parentW, beam_timeinterval=0.05
                 , num_shoot_iterations=401
                 , plus_iterations=200):

        super(PanelFrame, self).__init__()

        self.parentW = parentW

        # Content: An instance of class Panel
        # ~~~~~~~~~~~~~~~~~~~~~~~~~~~~~~~~~~~
        # Area gets "self" as parentW
        self.inner_area_widget = PanelArea(self
                                      , beam_timeinterval
                                      , num_shoot_iterations
                                      , plus_iterations)
        self.frame_layout = QVBoxLayout()
        self.setLayout(self.frame_layout)
        self.frame_layout.addWidget(self.inner_area_widget)

        self.setFrameShape(QFrame.Panel)
        self.setFrameShadow(QFrame.Raised)
        self.setLineWidth(20)
        #self.setStyleSheet("background-color: #302010; ")

        # No mouse-tracking required
        self.setMouseTracking(False)
We first apply the parent class constructor. We provide a reference to the parent widget, which, of course, will be an instance of class “MainWindow”. It also gets some parameters for the “laser beam” layout, which will be transferred to yet another object, an instance of a further class “PanelArea”. The layout is a vertical one, but gets only one element. The frame’s width around its inner contents was chosen to be extremely big, just to underline the effect. We tell the frame to simulate a raised contents. See the documentation for QFrame parameterization.
Cell 3 – Class “PanelArea”: The action panel and related functionality
Now we get to the central element of our application which not only provides an area for some (banal) action, but also most of the functionality required to control our “laser beam”. This is going to be a rather big class. So we split its contents.
class PanelArea(QWidget):

    def __init__(self, parentW
                 , beam_time_interval
                 , num_shoot_iterations
                 , plus_iterations):

        super(PanelArea, self).__init__()

        self.parentW = parentW
        self.beam_time_interval = beam_time_interval

        self.shoot_corners = False
        self.j_target = 0
        self.shooting_active = False
        self.num_shoot_iterations = num_shoot_iterations
        self.initial_num_shoot_iterations = num_shoot_iterations
        self.plus_iterations = plus_iterations

        # Track Mouse Movement
        self.setMouseTracking(True)
        self.mouse_x = 0
        self.mouse_y = 0

        # control changes of window size
        self.width_old = self.width()
        self.x_leaving = 0
        self.y_leaving = 0
        self.myheight = self.height()
        self.mywidth = self.width()

        # Parameters for central ellipse
        self.b_draw_ell = True
        self.ell_axis1 = 75
        self.ell_axis2 = 35

        # Laser beam
        self.b_plot_line = False
        self.b_rupt_line = False
        self.line = QLine()

        # Pens, brushes for drawing elements
        # ~~~~~~~~~~~~~~~~~~~~~~~~~~~~~~~~~~~~
        # line drawing
        self.pen_line = QPen(Qt.red, 3)
        # ellipse border
        # filling the ellipse
        self.pen_ell = QPen(Qt.black, 5)
        darkred = QColor(120, 0, 0)
        self.brush_ell = QBrush(darkred)

        # Draw the ellipse 1st time
        # ~~~~~~~~~~~~~~~~~~~~~~~~
        self.update()
Our “area” – panel is just a simple QWidget. We call it “panel”, because we set its surface as a “Panel Raised” via instructions in its framing parent widget “PanelFrame”.
We call the constructor of the parent class and we assign the reference to the parent widget to a member variable. The rest is mostly parameter setting. All these parameters will later be used to control elements which we have to paint. Among other things we set axes and color parameters for the ellipse. The laser beam will be realized by using the QLine standard class of PyQt. We also need different pens and brushes (instances of QPen, QBrush) to do the painting.
At the end we call an update-action on this widget. A paintEvent will be triggered and the code for a paintEvent will be executed. This leads to a drawing of the central ellipse in the beginning.
The parameters self.b_plot_line and self.b_rupt_line control whether the laser beam is shown in various situations. A setting “b_line_rupt=True” interupts line (beam) drawing. The beam shall not be shown initially. Neither shall a line be drawn when we want to shoot at the mouse pointer, but when the pointer is outside the action panel. You can interpret this as a kind of “saving shots”.
Cell 3 – Class “PanelArea”: Trigger drawing of the laser beam
The first two of the following functions trigger different ways to draw a “laser beam” line by switching parameter values. Either we shoot to corners or we shoot to the mouse position.
The “shooting” itself is triggered by a loop in function draw_line(). We limit the number of iterations. Interpret this as the maximum number of shots available. This number will be changed dynamically: Each time we press one of the shoot buttons we add 200 shots to the limit.
class PanelArea(QWidget):

    def __init__(self, parentW ...
    ....
    ....


    # Function to trigger beam to panel corners
    # ~~~~~~~~~~~~~~~~~~~~~~~~~~~~~~~~~~~~~~~~~~
    def draw_line_to_corners(self):
        self.shoot_corners = True
        self.b_rupt_line = False
        if self.shooting_active:
            self.num_shoot_iterations += self.plus_iterations
            self.parentW.parentW.print_addedShots()
        else:
            self.draw_line()


    # Function to trigger beam to mouse position
    # ~~~~~~~~~~~~~~~~~~~~~~~~~~~~~~~~~~~~~~~~~~
    def draw_line_to_mouse(self):
        self.shoot_corners = False
        self.b_rupt_line = True
        if self.shooting_active:
            self.num_shoot_iterations += self.plus_iterations
            self.parentW.parentW.print_addedShots()
        else:
            self.draw_line()


    # Control frequency of laser beam + number of "shots"
    # ~~~~~~~~~~~~~~~~~~~~~~~~~~~~~~~~~~~~~~~~~~~~~~~~~
    def draw_line(self):
        self.shooting_active = True

        # Loop for "shooting"
        # ~~~~~~~~~~~~~~~~~~~
        # Need while loop because we will
        # change "num_shoot_iterations" dynamically
        i = 0
        while i < self.num_shoot_iterations:
            # We have to drop painting peridically
            # for blinking effect
            if i%2 == 0:
                self.b_plot_line = True
            else:
                self.b_plot_line = False

            # Trigger a paintEvent and direct painting
            # ~~~~~~~~~~~~~~~~~~~~~~~~~~~~~~~~~~~~~~~
            self.update()
            QtWidgets.QApplication.processEvents()

            # raise iterator variable + printing
            # ~~~~~~~~~~~~~~~~~~~~~~~~~~~~~~~~~~
            # --- if shooting is not interrupted
            if not self.b_rupt_line:
                #print("i = ", i)
                i += 1
                # print shot reserve sometimes
                if i%100 == 0:
                    sr = self.num_shoot_iterations - (i+1)
                    self.parentW.parentW.print_shotReserve(sr, b_clear=False)


            # set frequency
            time.sleep(self.beam_time_interval)

        # Reset parameters
        # ~~~~~~~~~~~~~~~~~~~~
        self.b_plot_line = False
        self.shooting_active = False
        self.parentW.parentW.print_shoot_stop()
        self.num_shoot_iterations = self.initial_num_shoot_iterations
        sr = self.num_shoot_iterations
        self.parentW.parentW.print_shotReserve(sr, b_clear=True)
        # comment the next two statements
        # if you want to see the last beam intentionally
        self.update()
        QtWidgets.QApplication.processEvents()
We need a while-loop as we want to change the loop limit and the running variable during iterations. Why do we handle the shooting by a a modulo evaluation and not just by a time.sleep-interval? The reason is that a line will be painted in the code for the paintEvent after update()-requests. We have to interrupt its drawing explicitly. This is done by setting the parameters accordingly. Our modulo i%2 will lead to a blinking effect of the laser beam.
When the loop finalizes we reset parameters and print relevant information. Note: It is this relatively long loop, which gets executed in the foreground of Jupyterlab, which will block the execution of other code in other notebook cells
Cell 3 - Class "PanelArea": Reacting to events
Our application must react to some mouse-related events. This includes leaving the action panel area.
class PanelArea(QWidget):

    def __init__(self, parentW ...
    ....
    ....


    # Function to react to mouse movements
    # ~~~~~~~~~~~~~~~~~~~~~~~~~~~~~~~~~~~~
    def mouseMoveEvent(self, event):
        ##if event.type() == QtCore.QEvent.MouseMove:
        self.mouse_x = event.x()
        self.mouse_y = event.y()
        self.parentW.parentW.mouse_label.setText(
            'Mouse coords: ( %d : %d )' % (self.mouse_x, self.mouse_y))
        self.b_rupt_line = False

    # Function to interrupt shooting
    # when action panel area is left
    # ~~~~~~~~~~~~~~~~~~~~~~~~~~~~~~
    def leaveEvent(self, event):
        ##print("leave event")
        if not self.shoot_corners:
            self.b_rupt_line = True

    # Function to stop loop before closing
    # ~~~~~~~~~~~~~~~~~~~~~~~~~~~~~~~~~~~~
    def closeEvent(self, event):
        self.num_shoot_iterations = 0
        time.sleep(0.05)
        event.accept()
As a reaction to mouseMoveEvents we define a callback that updates the label-text of label "mouse_label" in the 1st row of our application window. When the area panel detects mouse movements (which it does not when the mouse pointer is outside) then we must in any case stop a potential interrupt of the shooting.
An important ingredient in our game is a event that signals that the mouse leaves the panel area. The respective event type is leaveEvent.
Note that we can just define the right callbacks for events by naming the functions as the event-type. See the Qt-documentation for event handling via virtual functions. When the panel is left we interrupt the shooting, but only if we are in the mode for shooting at the mouse pointer.
Regarding the reaction to the closeEvent of the innermost widget see below.
Cell 3 - Class "PanelArea": Handling the paintEvent after update()-requests.
Now we come to the most important function of class PanelArea, namely the painting. Such painting is done after some code has requested a re-painting of a widget via update()-requests.
As we have no Matplotlib here we must implement everything by ourselves by using graphical primitives of PyQt. We also include some logic to handle intermediate resizing of the application window. During such a resizing phase we do not want to see the beam. This is controlled by a variable b_plot_line2.
class PanelArea(QWidget):

    def __init__(self, parentW ...
    ....
    ....


    # Function to react to update-requests
    # ~~~~~~~~~~~~~~~~~~~~~~~~~~~~~~~~~~~~
    def paintEvent(self, event):

        # Short lived painter - see docu
        painter = QPainter(self)

        # !!!!!!
        # Width/height are only calculated correctly
        # within paintEvents during window resizing
        width = self.width()
        height = self.height()

        # Handle intermediate resizing
        # by interrupting beam display
        b_plot_line2 = True

        xc = int(width/2)
        yc = int(height/2)

        # standard target coordinates
        # - can be overwritten below
        xt = self.mouse_x
        yt = self.mouse_y

        if width != self.width_old or \
           height != self.height_old:
            b_plot_line2 = False
            xt = xc
            yt = yc

        #print("x,y:", y, x)
        self.center = QPoint(xc, yc)

        # Paint the laser beam (= line)
        # ~~~~~~~~~~~~~~~~~~~~~~~~~~~~~~
        # Setting painter properties
        painter.setPen(self.pen_line)

        if self.b_plot_line and b_plot_line2 \
        and not self.b_rupt_line :

            if self.shoot_corners:
                # set new target coordinates
                if self.j_target == 0:
                    xt = 0; yt = 0
                elif self.j_target == 1:
                    xt = self.width(); yt = 0
                elif self.j_target == 2:
                    xt = self.width(); yt = self.height()
                elif self.j_target == 3:
                    xt = 0; yt = self.height()

                if self.j_target == 3:
                    self.j_target = 0
                else:
                    self.j_target += 1

            self.target = QPoint(xt, yt)
            self.line = QLine(self.target, self.center)
            painter.drawLine(self.line)

        # Paint the central ellipse
        # ~~~~~~~~~~~~~~~~~~~~~~~~~
        # (brush needed to fill out area)
        painter.setPen(self.pen_ell)
        painter.setBrush(self.brush_ell)

        if self.b_draw_ell:
            painter.drawEllipse(QPoint(self.center)
                                , self.ell_axis1
                                , self.ell_axis2)

        self.width_old = width
        self.height_old = height
        self.mywidth = width
        self.myheight = height
We construct a so called (short lived) "painter" object. A "painter" is our main tool to later draw graphic primitives. A painter instance is derived from class QPainter. See the documentation and there in particular the text about the constructor. Note that we construct and destruct such a painter with each event. This is recommended. Other long lived painters would require a series of resetting commands.
An important point is that during window resizing the present actual width and height values for our panel area must be determined inside the paintEvent. Only then we can determine the center (xc, yc) and corner coordinates of the panel correctly (with a minimum delay, actually).
After the present center is known, we determine target coordinates (xt, yt) to direct our beam. These are either the present mouse coordinates (standard) or corner coordinates. With the calculated center and target coordinates we define start and end points (by using the QPoint class) for our line to draw.
Of course, there is always a slight delay regarding the mouse movement. So, the beams end will try to track the mouse, but will lag a bit behind. It hits the mouse pointer only if the mouse is not moved anymore.
The ellipse is drawn afterward - with a borderline (pen!) and a filled area (brush!).
How do we detect resizing of the panel area (due to window resizing)? A bit inelegantly by comparing the widget's dimensions between paintEvents. Why do I not show the beam in such a phase? The reason is that the during resizing the paintEvent is triggered with much higher frequency than that of our standard loop. We would the get very many redraws of the line to the corners overlapping with the standard events triggered by the loop. I avoid this.
Resize-handling could have been solved a bit more elegantly by using a QResizeEvent. Instead of comparing dimensions. But I leave a better implementation to the reader.
Note: Whenever we omit one of the drawing commands the respective primitive will not be shown.
We return now to functions of the MainWin class.
Cell 5 - Class MainWindow - button binding and print functionality
We are now well equipped to understand the functionality that some further methods of our MainWindow object provide. We return to cell 3 (!); the following code must be placed inside the MainWindow class. We need to bind button-events to callbacks.
class MainWindow(QtWidgets.QMainWindow):
    def __init__(self, shoot_interval, ...):
        ....
        ....


    # Bind user actions
    # ~~~~~~~~~~~~~~~~~
    def bind_buts_to_callbacks(self):
        self.but_shoot_corners.clicked.connect(self.print_clearStatusChange_Corners)
        self.but_shoot_corners.clicked.connect(self.frame1.inner_area_widget.draw_line_to_corners)
        self.but_shoot_mouse.clicked.connect(self.print_clearStatusChange_Mouse)
        self.but_shoot_mouse.clicked.connect(self.frame1.inner_area_widget.draw_line_to_mouse)
        self.but_kill_mouse.clicked.connect(self.kill_mouse_shooter)


    # Function to remove mouse_shooting
    # ~~~~~~~~~~~~~~~~~~~~~~~~~~~~~~~~~
    def kill_mouse_shooter(self):
        if not self.b_1st_click_but_kill:
            self.but_shoot_mouse.hide()
            if not self.frame1.inner_area_widget.shoot_corners:
                self.frame1.inner_area_widget.num_shoot_iterations = False
                self.frame1.inner_area_widget.b_plot_line = False
            self.frame1.inner_area_widget.b_draw_ell = False
            self.b_1st_click_but_kill = True
        else:
            self.but_shoot_mouse.setVisible(True)
            self.frame1.inner_area_widget.b_draw_ell = True
            self.frame1.inner_area_widget.update()
            QtWidgets.QApplication.processEvents()
            self.b_1st_click_but_kill = False


    # Function to write Output when changing to corner-shooting
    # ~~~~~~~~~~~~~~~~~~~~~~~~~
    def print_clearStatusChange_Corners(self):
        #print("her")
        font_act = self.textedit1.currentFont()
        text = "Status changed: Shoot at Corners\n"
        self.textedit1.moveCursor(QTextCursor.End)
        #f_act = self.textedit1.currentFont()
        # must be set after Cursor is moved
        self.textedit1.setFontWeight(QFont.Bold)
        self.textedit1.setTextColor(self.col_darkred)
        self.textedit1.insertPlainText(text)
        QtWidgets.QApplication.processEvents()
        #self.textedit1.setCurrentFont(font_act)


    # Function to write Output when changing to mouse-shooting
    # ~~~~~~~~~~~~~~~~~~~~~~~~~
    def print_clearStatusChange_Mouse(self):
        #print("her")
        font_act = self.textedit1.currentFont()
        text = "Status changed: Shoot at Mouse\n"
        self.textedit1.moveCursor(QTextCursor.End)
        #f_act = self.textedit1.currentFont()
        # must be set after Cursor is moved
        self.textedit1.setFontWeight(QFont.Bold)
        self.textedit1.setTextColor(self.col_darkblue)
        self.textedit1.insertPlainText(text)
        QtWidgets.QApplication.processEvents()


    # Function to write Infos about added shots
    # ~~~~~~~~~~~~~~~~~~~~~~~~~
    def print_addedShots(self):
        text = "Added shots: " + str(self.plus_iterations) + "\n"
        self.textedit1.moveCursor(QTextCursor.End)
        self.textedit1.setFontWeight(QFont.Normal)
        self.textedit1.setTextColor(self.col_black)
        self.textedit1.insertPlainText(text)
        #self.textedit1.append( text )
        QtWidgets.QApplication.processEvents()


    # Function to write Infos about shot reserve replenishing
    # ~~~~~~~~~~~~~~~~~~~~~~~~~
    def print_shotReserve(self, shotReserve, b_clear=False):
        if b_clear:
            self.textedit2.clear()
            text_stop = "Shooting stopped. Reserve replenished" + "\n"
            self.textedit2.moveCursor(QTextCursor.End)
            self.textedit2.setFontWeight(QFont.Normal)
            self.textedit2.setTextColor(self.col_black)
            self.textedit2.insertPlainText(text_stop)

        text = "Shot reserve: " + str(shotReserve) +"\n"
        self.textedit2.moveCursor(QTextCursor.End)
        self.textedit2.setFontWeight(QFont.Normal)
        self.textedit2.setTextColor(self.col_black)
        self.textedit2.insertPlainText(text)
        #self.textedit1.append( text )
        QtWidgets.QApplication.processEvents()

    # Function to write Infos about stopped shooting
    # ~~~~~~~~~~~~~~~~~~~~~~~~~
    def print_shoot_stop(self):
        text = "Shooting stopped" + "\n"
        self.textedit1.moveCursor(QTextCursor.End)
        self.textedit1.setFontWeight(QFont.Normal)
        self.textedit1.setTextColor(self.col_darkgreen)
        self.textedit1.insertPlainText(text)
        #self.textedit1.append( text )
        QtWidgets.QApplication.processEvents()


    # Function to stop loop before killing the app window
    # ~~~~~~~~~~~~~~~~~~~~~~~~~~~~~~~~~~~~~~~~~~~~~~~~~~
    def closeEvent(self, event):
        self.frame1.inner_area_widget.num_shoot_iterations = 0
        print("User is closing Main Win ")
        # just to be on the safe side
        time.sleep(0.1)
        # required !
        event.accept()
Binding of button events happens in function bind_buts_to_callbacks(). You see that we can bind a button-event to multiple functions. (Actually, this makes use of another inter-object communication mechanism than sending events to the event-loop. You will read more about this in the next post.)
Some of the callback functions just write output to our QTextEdit-elements which we placed in the bottom row of our window. The code shows how you can set elementary properties like color and weight of the text font. For more options see the documentation on the QTextEdit-widget. A typical mistake one can make hear is that you change properties before you move the text-cursor. You should always do it the other way round.
More interesting is the closeEvent(). Our loop in function draw_line() of the panel area would continue to run in the Jupyterlab-environment, even when you have closed the window. So, we stop the loop. The attentive reader will have noticed that I had implemented a similar reaction in the PanelArea-class. This is a double-caution. The reason is that I do not exactly know in which order destructors for the widgets are called. In our case closing properly is not super-important. We will, however, see in the course of this post series that proper closing becomes much more important when we have to deal with threads running in the background.
The reader may have missed some comments on the third button with thr label "kill mouse shooter". I invite you to try and understand it by yourself. And you may also notice that it is basically a toggle.
Cell 6 - Test of application and video
The last cell of our application simply starts it.
shoot_interval = 0.05
num_shoot_iterations = 401
plus_iterations = 200
mainWin = MainWindow(shoot_interval, num_shoot_iterations, plus_iterations)
At the following link you find a video showing how this simple (stupid) application works. Remember: It is just for the purpose of demonstrating that one can really use PyQt with Jupyterlab.
Code
The full code of my test application can also be found in the following PDF.
Conclusion
This post has shown that and how we can use PyQt from a Python3 notebook within Jupyterlab. We just have to use the QtAgg-backend for Matplotlib. This opens up for a variety of options in the future - not least in combination with ML-algorithms.
A major disadvantage of our application is that action is prepared by a (long lasting) loop in the foreground. To get other code cells in our Jupyterlab notebooks free most of the computation should be done in the background of Jupyterlab.
Unfortunately, QtAgg and the Qt framework require that graphics action and redrawing must be performed from the main thread in the foreground. So, we cannot just put the whole application in the background. Its time to gather more experience with threads and their communication. The next post of this series
Using PyQt with QtAgg in Jupyterlab – II – excursion on threads, signals and events
will provide more information.
In the meantime I recommend to start a MainWindow twice in your notebook. Yes, this is possible if you give the instances different names. Try to understand what happens when you press buttons in either application window ...
Links / Literature
[1] https://stackoverflow.com/ questions/49952610/ pyqt5-draw-a-line-by-clicking-qpushbutton
[2] Regarding the present QtAgg backend code, see here (https://github.com/ matplotlib/ matplotlib/ blob/ v3.8.2/ lib/ matplotlib/ backends/ backend_qt.py). You will find that an object of class QtWidgets.QApplication is instantiated. It inherits from class QtCore.QCoreApplication and QtCore.QGuiApplication and thus sets up the main loop.
[3] Regarding QtWidget.QApplication see the Qt- documentation here, and regarding the main loop here.
[4] Introduction to PyQt5/6: https://www.pythonguis.com/pyqt5-tutorial/
[5] Setting a new "sub-window": https://clay-atlas.com/ us/blog/2021/06/26/ pyqt5-en-open-sub-window/