Machine Learning on a Linux system is no fun without a GPU and its parallel processing capabilities. On a system with a Nvidia card you need basic Nvidia drivers and additional libraries for optimal support of Deep Neural Networks and Linear Algebra operations on the GPU sub-processors. E.g., Keras and Tensorflow 2 [TF2] use CUDA and cuDNN-libraries on your Nvidia GPU. Basic information can be found here:
- https://en.wikipedia.org/wiki/CUDA
- https://www.bigdata-insider.de/was-ist-cudnn-a-780686/
- https://reason.town/tensorflow-2-8-cuda/
- https://www.run.ai/guides/gpu-deep-learning/keras-gpu
This means that you must not only perform an installation of (proprietary) Nvidia drivers, but also of CUDA and cuDNN on your Linux system. As I have started to work with ResNet-110v2 and ResNet-164v2 variants lately I was interested whether I could get a combination of
- TF 2.15 with Keras
- the latest of Nvidia GPU drivers 545.29.06 – but see the Addendum at the end of the post and the warnings therein.
- the latest CUDA-toolkit version 12.3
- and cuDNN version 8.9.7
to work on an Opensuse Leap 15.5 system. This experiment ended successfully, although the present compatibility matrices on the Nvidia web pages do not yet include the named combination. While system wide installations of the CUDA-toolkit and cuDNN are no major problems, some additional settings of environment variables are required to make the libraries available for Python notebooks in Jupyterlab or classic Jupyter Notebooks (i.e. IPython based environments). These settings are not self-evident.
This post summarizes the most important steps of a standard system-wide installation of CUDA and cuDNN on an Opensuse Leap 15.5 system. I do not install TensorRT in this post. As long as you do not work with (pre-trained) LLMs you do not really need TensorRT.
Level of his post: Active ML user – advanced. You should know how RPM and tar-based installations work on a Leap system. You should also have a working Python3 installation (in a virtual environment) and a Jupyter Notebook or (better) a Jupyterlab-installation on your system to be able to perform ML-tests based on Keras. I do not discuss a Jupyter and Python installation in this post.
Limitations and requirements
GPU capabilities: You need a fairly new Nvidia graphics card to make optimal use of the latest CUDA features. In my case I tested with a Nvidia 4060 TI. Normally the drivers and libraries should detect the capabilities of older cards and adapt to them. But I have not tested with older graphics cards.
Disk space: CUDA and cuDNN require a substantial amount of disk space (almost 7 GiB) when you install the full CUDA-toolkit as it is recommended by NVIDIA.
Remark regarding warnings: Installing CUDA 12.3 and using it with Tensorflow 2.15 will presently (Jan. 2024) lead to warnings in your Python 3 notebooks. However, in my experience these warnings have no impact on the performance. My 4060 TI did its job in test calculations with convolutional Autoencoders and ResNets as expected. Regarding ResNets even 5% faster than with CUDA 11.2.
Alternative installation methods: You may find information about a pure Python based installations including CUDA via pip. See e.g. here: https://blog.tensorflow.org/2023/11/whats-new-in-tensorflow-2-15.html. While this potentially makes local user-specific installations easier, the disadvantage for multiple virtual Python environments is the resulting consumption of disk space. So, I still prefer a system wide installation. It also seems to be such that one should not mix both ways of installation – system-wide and virtual-environment specific. I have e.g. tried to install TensorRT via pip after a systemwide standard CUDA installation. The latter itself had worked. But after the additional TensorRT installation with pip my GPU could no longer used by Keras/TF2 based ML code started from Jupyterlab notebooks.
Installation of basic Nvidia drivers
The Nvidia graphics card must already be supported for regular X or Wayland services on a Linux system. CUDA and cuDNN come on top.
Note: You need a fairly new Nvidia driver for CUDA-12.3 ! To get the latest drivers for an Opensuse system I install the proprietary Nvidia drivers from the Opensuse’s Nvidia repository:
Nvidia Repository address for Leap 15.5: https://download.nvidia.com/opensuse/leap/15.5
Note that presently YaST2 has a bug (see here). You may need to use zypper on the command-line to this repository to your package manager. See the man pages for zypper for the right syntax. IN the end you should see the Nvidia repository in YAST2:

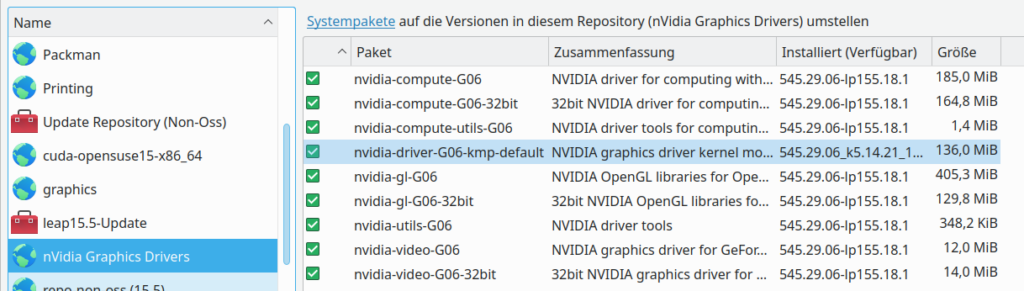
I selected driver version 545.29.06. The installation worked flawlessly. The installed files end up in /usr/lib/ and /usr/lib64/. For /usr/lib64/ the following list shows an excerpt of the installed files:
mytux:/usr/lib64 # la | grep nvid
lrwxrwxrwx   1 root root        26 Nov 23 04:36 libEGL_nvidia.so.0 -> libEGL_nvidia.so.545.29.06
-rwxr-xr-x   1 root root   1341568 Nov 23 04:36 libEGL_nvidia.so.545.29.06
lrwxrwxrwx   1 root root        32 Nov 23 04:36 libGLESv1_CM_nvidia.so.1 -> libGLESv1_CM_nvidia.so.545.29.06
-rwxr-xr-x   1 root root     68000 Nov 23 04:36 libGLESv1_CM_nvidia.so.545.29.06
lrwxrwxrwx   1 root root        29 Nov 23 04:36 libGLESv2_nvidia.so.2 -> libGLESv2_nvidia.so.545.29.06
-rwxr-xr-x   1 root root    117144 Nov 23 04:36 libGLESv2_nvidia.so.545.29.06
lrwxrwxrwx   1 root root        26 Nov 23 04:36 libGLX_nvidia.so.0 -> libGLX_nvidia.so.545.29.06
-rwxr-xr-x   1 root root   1203776 Nov 23 04:36 libGLX_nvidia.so.545.29.06
lrwxrwxrwx   1 root root        32 Nov 23 04:36 libnvidia-allocator.so.1 -> libnvidia-allocator.so.545.29.06
-rwxr-xr-x   1 root root    160552 Nov 23 04:36 libnvidia-allocator.so.545.29.06
-rwxr-xr-x   1 root root    645480 Nov 23 04:36 libnvidia-api.so.1
lrwxrwxrwx   1 root root        26 Nov 23 04:36 libnvidia-cfg.so.1 -> libnvidia-cfg.so.545.29.06
-rwxr-xr-x   1 root root    274968 Nov 23 04:36 libnvidia-cfg.so.545.29.06
lrwxrwxrwx   1 root root        26 Nov 23 04:36 libnvidia-egl-gbm.so.1 -> libnvidia-egl-gbm.so.1.1.0
-rwxr-xr-x   1 root root     22768 Nov 23 04:36 libnvidia-egl-gbm.so.1.1.0
lrwxrwxrwx   1 root root        31 Nov 23 04:36 libnvidia-egl-wayland.so.1 -> libnvidia-egl-wayland.so.1.1.12
-rwxr-xr-x   1 root root     68992 Nov 23 04:36 libnvidia-egl-wayland.so.1.1.12
-rwxr-xr-x   1 root root  29793544 Nov 23 04:36 libnvidia-eglcore.so.545.29.06
lrwxrwxrwx   1 root root        29 Nov 23 04:36 libnvidia-encode.so.1 -> libnvidia-encode.so.545.29.06
-rwxr-xr-x   1 root root    252576 Nov 23 04:36 libnvidia-encode.so.545.29.06
lrwxrwxrwx   1 root root        26 Nov 23 04:36 libnvidia-fbc.so.1 -> libnvidia-fbc.so.545.29.06
-rwxr-xr-x   1 root root    138048 Nov 23 04:36 libnvidia-fbc.so.545.29.06
-rwxr-xr-x   1 root root  31844896 Nov 23 04:36 libnvidia-glcore.so.545.29.06
-rwxr-xr-x   1 root root    578712 Nov 23 04:36 libnvidia-glsi.so.545.29.06
-rwxr-xr-x   1 root root   9052848 Nov 23 04:36 libnvidia-glvkspirv.so.545.29.06
-rwxr-xr-x   1 root root  43303456 Nov 23 04:36 libnvidia-gpucomp.so.545.29.06
-rwxr-xr-x   1 root root   1383816 Nov 23 04:36 libnvidia-gtk2.so.545.29.06
-rwxr-xr-x   1 root root   1388424 Nov 23 04:36 libnvidia-gtk3.so.545.29.06
lrwxrwxrwx   1 root root        17 Nov 23 04:36 libnvidia-ml.so -> libnvidia-ml.so.1
lrwxrwxrwx   1 root root        25 Nov 23 04:36 libnvidia-ml.so.1 -> libnvidia-ml.so.545.29.06
-rwxr-xr-x   1 root root   1992128 Nov 23 04:36 libnvidia-ml.so.545.29.06
lrwxrwxrwx   1 root root        26 Nov 23 04:36 libnvidia-ngx.so.1 -> libnvidia-ngx.so.545.29.06
-rwxr-xr-x   1 root root   4558008 Nov 23 04:36 libnvidia-ngx.so.545.29.06
lrwxrwxrwx   1 root root        27 Nov 23 04:36 libnvidia-nvvm.so.4 -> libnvidia-nvvm.so.545.29.06
-rwxr-xr-x   1 root root  86781944 Nov 23 04:36 libnvidia-nvvm.so.545.29.06
lrwxrwxrwx   1 root root        29 Nov 23 04:36 libnvidia-opencl.so.1 -> libnvidia-opencl.so.545.29.06
-rwxr-xr-x   1 root root  24354232 Nov 23 04:36 libnvidia-opencl.so.545.29.06
lrwxrwxrwx   1 root root        34 Nov 23 04:36 libnvidia-opticalflow.so.1 -> libnvidia-opticalflow.so.545.29.06
-rwxr-xr-x   1 root root     67704 Nov 23 04:36 libnvidia-opticalflow.so.545.29.06
-rwxr-xr-x   1 root root     10352 Nov 23 04:36 libnvidia-pkcs11-openssl3.so.545.29.06
-rwxr-xr-x   1 root root     10328 Nov 23 04:36 libnvidia-pkcs11.so.545.29.06
lrwxrwxrwx   1 root root        37 Nov 23 04:36 libnvidia-ptxjitcompiler.so.1 -> libnvidia-ptxjitcompiler.so.545.29.06
-rwxr-xr-x   1 root root  26589472 Nov 23 04:36 libnvidia-ptxjitcompiler.so.545.29.06
-rwxr-xr-x   1 root root 107671632 Nov 23 04:36 libnvidia-rtcore.so.545.29.06
-rwxr-xr-x   1 root root     18632 Nov 23 04:36 libnvidia-tls.so.545.29.06
-rwxr-xr-x   1 root root     10088 Nov 23 04:36 libnvidia-wayland-client.so.545.29.06
lrwxrwxrwx   1 root root        26 Nov 23 04:36 libvdpau_nvidia.so -> vdpau/libvdpau_nvidia.so.1
drwxr-xr-x   3 root root      4096 Jan 13 17:04 nvidia
And a look into /usr/lib64/nvidia reveals:
mytux:/usr/lib64/nvidia # la
total 376
drwxr-xr-x   3 root root   4096 Jan 13 17:04 .
drwxr-xr-x 334 root root 335872 Jan 14 16:46 ..
lrwxrwxrwx   1 root root     18 Nov 23 04:36 libOpenCL.so.1 -> libOpenCL.so.1.0.0
-rwxr-xr-x   1 root root  35064 Nov 23 04:36 libOpenCL.so.1.0.0
drwxr-xr-x   2 root root   4096 Jan 13 17:04 wine
I assume that you have in addition followed the standard rules to deactivate the nouveau drivers. See e.g. here – and in particular the section about blacklisting the nouveau driver. Afterward you should be able to load the “nvidia.ko”-module:
mytux:~ # lsmod | grep nvidia
nvidia_drm             94208  64
nvidia_modeset       1331200  128 nvidia_drm
drm_kms_helper        184320  3 nvidia_drm
nvidia_uvm           1507328  6
nvidia              56217600  2037 nvidia_uvm,nvidia_modeset
drm                   610304  68 drm_kms_helper,nvidia,nvidia_drm
mytux:~ #
To get the module into your boot process you may have to call mkinitrd with the loaded nvidia-module.
Hint 1: Also the CUDA repository, from which which we will later install the CUDA-toolkit, offers driver files. However, on my systems I have always followed a policy to install Nvidia drivers from Opensuse’s Nvidia community repository instead via CUDA.
Hint 2: Regarding /etc/alternatives the entry for libOpenCL should look like
mytux:/usr/lib64/nvidia # cd /etc/alternatives
mytux:/etc/alternatives # la | grep libOp
lrwxrwxrwx   1 root root    32 Mar  9  2023 libOpenCL.so.1 -> /usr/lib64/nvidia/libOpenCL.so.1
CUDA repository and installation of cuda-toolkit-12.3
Note: The driver installation (including compute packages) does not make the CUDA installation unnecessary. See https://docs.nvidia.com/deploy/cuda-compatibility/index.html.
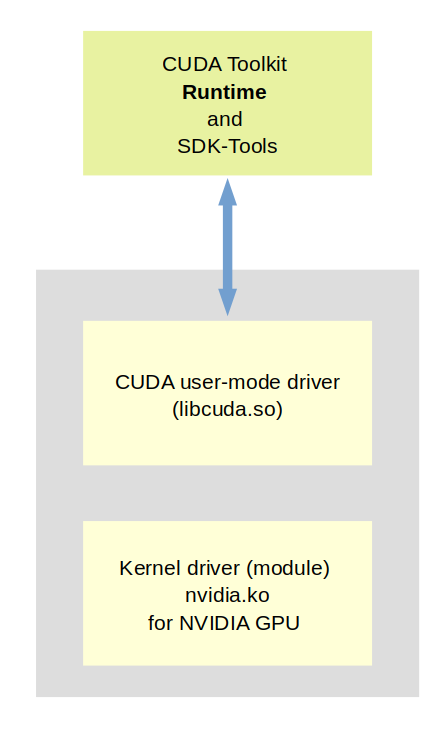
The CUDA toolkit contains both SDK libraries as well as CUDA runtime components.
Actually, I am not so sure what components of the toolkit really are required to run a Tensorflow 2 and Keras based application without any problems on a single GPU on a Linux system.
All literature I have seen, recommend to install the (full) CUDA toolkit. Probably, this is not really necessary for run-time applications. The toolkit contains very many files which obviously are SDK files. There is also a meta-package just for runtime files, only. I admit: I have NOT tried this kind of installation.
Unfortunately, I have no time to play around. Please, send me a mail if you know what is really required. Below, I Just install the full CUDA 12.3-toolkit.
Looking at [1] and selecting “Linux”, “x86_64″, OpenSUSE”, “version 15”, “rpm (network)” provides you some commands to add a repository to Opensuse’s RPM management via zypper.
Once loaded the repository can be used via the YaST2 interface for SW and package management.


The interesting information at [1] is that we do not need to install all of the available CUDA packages in this repository for the toolkit. The relevant meta rpm for the toolkit is named “cuda-toolkit-12-3“.
In Yast2 you find it here:

Hint: On my system I had installed CUDA 11.2 before. Probably, you also have some older CUDA installation on your Linux machine. I suggest that (if you have enough disk space) not to deinstall CUDA 11.2 packages before everything works with CUDA 12.3.
We install the meta RPM cuda-toolkit-12.3 (version 12.3.2-1.x86_64). It subsequently installs a lot of files.
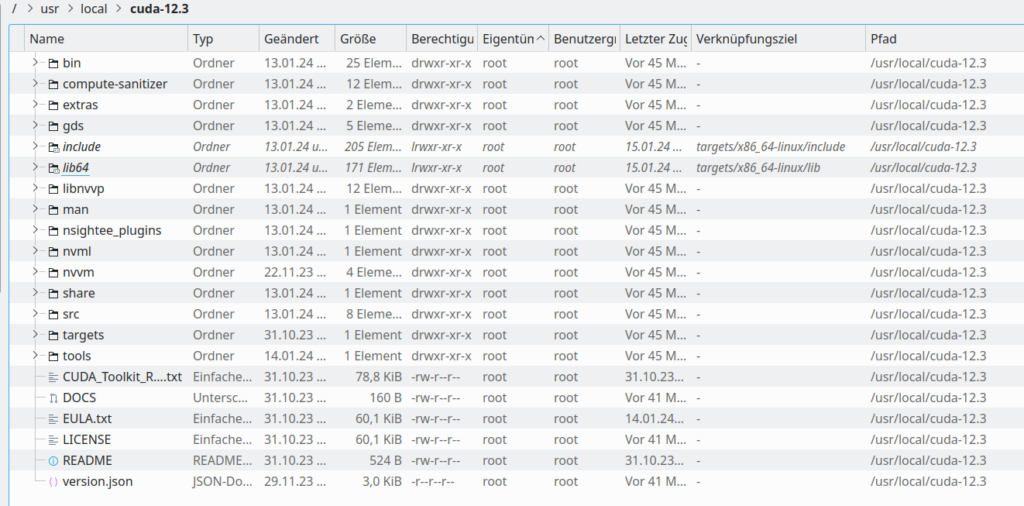
Where are the CUDA toolkit files installed?
You find the CUDA installation at the directory “/usr/local/cuda-12.3/”. Note that there are further links in “/usr/local/” which should point to the new installation, too:

You see, however, that the links are indirect. So, we have to check later that the named entries in /etc/alternatives point to the right directory.
Installation of cuDNN Release 8.9.7
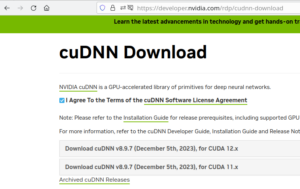
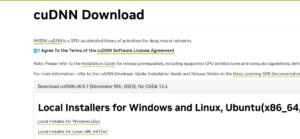
We need additionally libraries which come under the name of Nvidia cuDNN (see https://developer.nvidia.com/cudnn). These are special libs to support and optimize operations required for really Deep Neural Networks. Unfortunately, Nvidia wants an account and data of you to give you access to these libraries. As soon as you are logged in into such an account you can download a tar file for x86_64 architectures.
Save the file and extract the contents. In my case the directory for the extracted files was located at
/extras/Updates/nvidia/cudnn-linux-x86_64-8.9.7.29_cuda12-archive/
The installation guide at https://docs.nvidia.com/deeplearning/cudnn/install-guide/index.html describes what to do next, namely to copy files to target directories within the /usr/local/cuda-12.3/ directory. So, cuDNN is handled as a part of CUDA in the end. Why does Nvidia separate the installations? Well, you have to ask them. It may have to do with political restrictions.
In my case:
mytux:/usr/lib64 # cd /extras/Updates/nvidia/cudnn-linux-x86_64-8.9.7.29_cuda12-archive/
mytux:/extras/Updates/nvidia/cudnn-linux-x86_64-8.9.7.29_cuda12-archive # cp include/cudnn*.h /usr/local/cuda-12.3/include
mytux:/extras/Updates/nvidia/cudnn-linux-x86_64-8.9.7.29_cuda12-archive # cp -P lib/libcudnn* /usr/local/cuda-12.3/lib64
mytux:/extras/Updates/nvidia/cudnn-linux-x86_64-8.9.7.29_cuda12-archive # chmod a+r /usr/local/cuda-12.3/include/cudnn*.h /usr/local/cuda-12.3/lib64/libcudnn*
Changes in /etc/alternatives
The next step is an important one. On an Opensuse system (and other modern Linux systems) you may have “alternative” installations for certain components. Entries in /etc/alternatives/ may guide the system to your presently preferred variant. If you have not changed entries there already via some frontend (like YaST), you will probably find that they point to an older CUDA installation – in my case 11.2.
So you should change the links there to point to the new CUDA/cuDNN-installation :
mytux:/etc/alternatives # la | grep cuda
lrwxrwxrwx   1 root root    20 Jan 13 15:17 cuda -> /usr/local/cuda-12.3
lrwxrwxrwx   1 root root    20 Jan 13 15:17 cuda-12 -> /usr/local/cuda-12.3
lrwxrwxrwx   1 root root    36 Jan 13 15:17 cufile.json -> /usr/local/cuda-12.3/gds/cufile.json
lrwxrwxrwx   1 root root    34 Jan 14 16:54 libcudnn -> /usr/local/cuda/include/cudnn_v8.h
lrwxrwxrwx   1 root root    33 Jan 14 16:56 libcudnn.so -> /usr/local/cuda/lib64/libcudnn.so
Due to the links in “/usr/local/” pointing to these entries everything should work now consistently. If you do not trust the back-and-forth of the links set cuda-12.3 explicitly also for the cudnn-related entries.
Note that due to my installation of the drivers I have an entry of the following form, too:
mytux:/etc/alternatives # la | grep nvi
lrwxrwxrwx   1 root root    49 Mar  8  2020 alternate-install-present -> /usr/lib/nvidia/alternate-install-present-default
lrwxrwxrwx   1 root root    32 Mar  9  2023 libOpenCL.so.1 -> /usr/lib64/nvidia/libOpenCL.so.1
Environment Variables and starting Jupyterlab
Unfortunately, we still need some more configuration. We must inform Jupyterlab about CUDA via environment variables.
I always use a small bash-script to start Jupyterlab (or classical Jupyter notebook) from the directory of a virtual Python installation. Let us assume that the virtual environment we use is located at “/projects/ml/” and that you ownership and access rights to this directory. Then a script to start your Jupyterlab from this environment could have the following contents:
cd /projects/ml
export OPENBLAS_NUM_THREADS=4
export OMP_NUM_THREADS=4
export XLA_FLAGS=--xla_gpu_cuda_data_dir=/usr/local/cuda-12.3
export TF_XLA_FLAGS=--tf_xla_auto_jit=1
export PATH=/usr/local/cuda-12.3/bin${PATH:+:${PATH}}
export LD_LIBRARY_PATH=/usr/local/cuda-12.3/lib64${LD_LIBRARY_PATH:+:${LD_LIBRARY_PATH}}
source bin/activate
jupyter lab
Both the variables PATH and LD_PATH with the added path to /usr/local/cuda-12.3 should be provided.
For the XLA_FLAGS see e.g.:
- https://stackoverflow.com/questions/54189268/how-to-let-tensorflow-xla-know-the-cuda-path
- https://github.com/tensorflow/tensorflow/issues/44683
- https://stackoverflow.com/questions/60966894/is-tensorflow-xla-deprecated
- https://docs.nvidia.com/deeplearning/deeplearning/frameworks/tensorflow-user-guide/index.html
The last of the listed links provides a lot of information about other possible XLA-flags. Note that you can also set environment variables within your Python3 code via the “os”-module.
Hint: For some Keras models one may gain speed and performance by switching to “mixed precision”. This means that some operations are done with “float 16”-precision, only. Such operations on a GPU are much faster than float32-operations. See e.g.
https://colab.research.google.com/github/keras-team/keras-io/blob/master/guides/ipynb/keras_cv/generate_images_with_stable_diffusion.ipynb
and
https://keras.io/guides/keras_cv/generate_images_with_stable_diffusion/
for more information.
Final checks
You should check whether some old links are present to old cuDNN files in /usr/lib and /usr/lib64 and delete them. In addition have a look at /etc/alternatives and correct potential and outdated settings there.
Tests
A first important test is that your Tensorflow libraries recognize the GPU. Below, I only show some TF and Keras modules which I load for a ResNet model.
os.environ['TF_CPP_MIN_LOG_LEVEL'] = '1'
import tensorflow as tf
from tensorflow import keras as K
from tensorflow.keras import backend as B
from tensorflow.keras.models import Model

from tensorflow.keras import regularizers
from tensorflow.keras.regularizers import l2

from tensorflow.keras import optimizers
from tensorflow.keras.optimizers import Adam
from tensorflow.keras.optimizers import schedules

from tensorflow.keras import metrics

from tensorflow.keras.layers import Input, Conv2D, Flatten, Dense, Conv2DTranspose, \
Reshape, Lambda, Activation, BatchNormalization, ReLU, LeakyReLU, \
ELU, Dropout, AlphaDropout, Concatenate, Rescaling, ZeroPadding2D, \
Layer, AveragePooling2D
from tensorflow.keras.layers import add

from tensorflow.keras.utils import to_categorical
from tensorflow.keras.utils import plot_model

from tensorflow.keras.preprocessing.image import ImageDataGenerator

from tensorflow.keras.callbacks import ModelCheckpoint, LearningRateScheduler
from tensorflow.keras.callbacks import ReduceLROnPlateau
I do get some warnings, which, however, do not hamper performance afterward:
2024-01-21 15:29:20.980446: E external/local_xla/xla/stream_executor/cuda/cuda_dnn.cc:9261] Unable to register cuDNN factory: Attempting to register factory for plugin cuDNN when one has already been registered
2024-01-21 15:29:20.980465: E external/local_xla/xla/stream_executor/cuda/cuda_fft.cc:607] Unable to register cuFFT factory: Attempting to register factory for plugin cuFFT when one has already been registered
2024-01-21 15:29:20.981436: E external/local_xla/xla/stream_executor/cuda/cuda_blas.cc:1515] Unable to register cuBLAS factory: Attempting to register factory for plugin cuBLAS when one has already been registered
2024-01-21 15:29:21.747257: W tensorflow/compiler/tf2tensorrt/utils/py_utils.cc:38] TF-TRT Warning: Could not find TensorRT
An important step is to check that we can use the module “nvidia_smi” and see the GPU. There is a small trick which I myself often forget. You must install the following module for Python3 nvidia-ml-py3. We run a notebook cell with the following code:
import nvidia_smi
print()
nvidia_smi.nvmlInit()
handle = nvidia_smi.nvmlDeviceGetHandleByIndex(0)
# card id 0 hardcoded here, there is also a call to get all available card ids, so we could iterate
info = nvidia_smi.nvmlDeviceGetMemoryInfo(handle)
print("Total memory:", info.total, "\nFree memory:", info.free, "\nUsed memory:", info.used)
We should get information about the VRAM:
Total memory: 17175674880
Free memory: 15054274560
Used memory: 2121400320
Now the central test whether Tensorflow recognizes the GPU. The following notebook cell
# Checking Graka
os.environ['TF_CPP_MIN_LOG_LEVEL'] = '2'
tf.config.experimental.list_physical_devices()
should give you something like
[PhysicalDevice(name='/physical_device:CPU:0', device_type='CPU'),
 PhysicalDevice(name='/physical_device:GPU:0', device_type='GPU')]
Giving you a full code for a ResNet V2 is beyond the scope of this post. For the architecture of a ResNetV2 model please see here
and [5], [6].
I give you some results for a ReseNet-v2 configuration with an input stack with 32 filters and three stacks each with 18 V2 Residual Units with 128, 256 and 512 filters. This corresponds to a ResNet-164v2. I applied it to the CIFAR10 dataset.
In comparison to what Atienza describes in his book [5] this setting for the filter numbers is a bit of an overkill for the CIFAR 10 dataset. But this was only for test purposes. The ResNet-164v2 does not converge better or reaches a better accuracy on the test data than a ResNet-110v2 with 16, 64, 28, 256 filters for the residual units in their stacks.
I use on-the-fly data augmentation via Keras’ “ImageGenerator” (see [5] for more information). A batch size of bs=64 was chosen. VRAM consumption is around 6.9 GiB. The data below show excerpts for a training run with 10 epochs between epoch 10 and 20.
Using real-time data augmentation.
Learning rate:  0.001

Epoch 11: LearningRateScheduler setting learning rate to 0.001.
Epoch 11/20

WARNING: All log messages before absl::InitializeLog() is called are written to STDERR
I0000 00:00:1705857760.828063   19161 device_compiler.h:186] Compiled cluster using XLA!
This line is logged at most once for the lifetime of the process.

782/782 [==============================] - ETA: 0s - loss: 0.8588 - acc: 0.8208
Epoch 11: val_acc improved from -inf to 0.64410, saving model to xxx.h5

UserWarning: You are saving your model as an HDF5 file via `model.save()`.
This file format is considered legacy. We recommend using instead the native Keras format, e.g. `model.save('my_model.keras')`.
...
782/782 [==============================] - 327s 269ms/step - loss: 0.8588 - acc: 0.8208 - val_loss: 1.6167 - val_acc: 0.6441 - lr: 0.0010
Learning rate:  0.0006

Epoch 12: LearningRateScheduler setting learning rate to 0.0006.
Epoch 12/20
782/782 [==============================] - ETA: 0s - loss: 0.7292 - acc: 0.8574
Epoch 12: val_acc improved from 0.64410 to 0.76460, saving model to xxx.h5
782/782 [==============================] - 133s 170ms/step - loss: 0.7292 - acc: 0.8574 - val_loss: 1.0487 - val_acc: 0.7646 - lr: 6.0000e-04
Learning rate:  0.0006
...
...
Epoch 17: LearningRateScheduler setting learning rate to 0.0006.
Epoch 17/20
782/782 [==============================] - ETA: 0s - loss: 0.6179 - acc: 0.8783
Epoch 17: val_acc did not improve from 0.78900
782/782 [==============================] - 131s 167ms/step - loss: 0.6179 - acc: 0.8783 - val_loss: 1.0081 - val_acc: 0.7830 - lr: 6.0000e-04
Learning rate:  0.0006
...
...
Epoch 20: LearningRateScheduler setting learning rate to 0.0006.
Epoch 20/20
782/782 [==============================] - ETA: 0s - loss: 0.5781 - acc: 0.8878
Epoch 20: val_acc improved from 0.82520 to 0.83320, saving model to xxx..h5
782/782 [==============================] - 131s 168ms/step - loss: 0.5781 - acc: 0.8878 - val_loss: 0.7681 - val_acc: 0.8332 - lr: 6.0000e-04
An astonishing thing is that Tensorflow obviously reanalyzes the performance within the second epoch. Afterward the epoch time goes down significantly. While the first epoch takes more than 330 secs, later epochs only require 131 secs. The reevaluation of Tensorflow of its handling of the graphs is a topic for a separate post. I saw this behavior also for other Keras based models with convolutional layers.
For a ResNet-110v2 the data scale down to something like 80 secs per epoch.
Note that the data augmentation via an ImageGenerator takes time. Furthermore no optimization for “mixed precision” was used. I also check accuracy on the test data every epoch and save all date for models with an improved accuracy for the test dataset. So, for a pure training without augmentation and no accuracy test on validation or test data the performance would be better. A ResNet-110v2 reaches its target accuracy of 93% on the test (!) data and 99% on the training data at around 50 epochs for some intelligent reduction of the learning rate and an Adam optimizer.
All in all the data show that TF2 uses the GPU with the installed CUDA and cuDNN libraries. Furthermore XLA compilation is used.
Cleaning up old CUDA installations
Before you eliminate any old installations you should be sure that all of your important ML-programs work with the new CUDA-installation. Please, also check that the link “/usr/local/cuda” points to “/usr/local/cuda-12.3”. Verify that entries in “/etc/alternatives” regarding cuda and cudnn point to the right directories and/or files.
While most old CUDA packages can be deinstalled via YaST2 and the CUDA repository, also old cuDNN files have found their place in /usr/local/cuda-11.x or /usr/local/cuda-12.x. Therefore, you probably must delete the directory “/usr/local/cuda-11.x” or other directories with old CUDA-toolkit-files manually in the end.
Conclusion
The installation of CUDA and cuDNN files on an Opensuse Leap system is a relatively straightforward process. But we have seen that we have to set certain environment variables to inform Jupyterlab and Jupyter Notebook about the location of CUDA files and other TF2 and XLA parameters. In addition links must be set correctly both in “/usr/local” and “/etc/alternatives”. Afterward Keras and TF2 based ML models like a ResNetV2 are compiled (including XLA directves) and computed on a modern Nvidia GPU.
Important addendum 01/27/2024
Where there is light there is also shadow:
Although the combination of CUDA 12.3, cuDNN 8.9.7, Tensorflow 2.15 and Nvidia drivers 545.29.06 works regarding AI-models , there is another problem on a Leap 1.5 system with KDE:
Nvidias driver 545.29.06 is buggy at least for multi-screen systems and KDE. Suspend to RAM seems to work in the suspend phase and the system also comes up afterward in a seemingly proper state of your KDE/Plasma interface (on your multiple screens).
However, the problems begin when you want to change to another virtual screen via Ctrl-Alt-Fx. You wait and wait and wait … The same for changing the run-level or systemd target state or when you want to shut the system down. In the end this makes Suspend-to-Ram unusable.
Recommendation:
If you have a working older Nvidia driver (e.g. a stable 535 version) do not change to 545.29.06. Unfortunately, it is a mess on a multi-screen Leap 15.5 system to return to an older driver version. The Nvidia community repository does not offer you a choice. (Why by the way ????).
Downloading an older proprietary driver from Nvidia and trying to install it afterward on a console terminal (after having stopped X11 or Wayland) did not work in my case – the screens displaying the terminal changed their resolution and froze afterward. So, you may have to completely uninstall the present driver 545 completely, go back to standard VGA and then try to install an older driver via Nvidias install mechanism. As I said: It is a mess …
Links / Literature
[1] https://developer.nvidia.com/cuda-downloads
[2] Alternative installation with conda on Linux: https://rosenfelder.ai/setup-keras-and-tensorflow/
[3] On Ubuntu:
https://practicaldatascience.co.uk/machine-learning/how-to-test-your-keras-cuda-cudnn-tensorflow-install
https://medium.com/mlearning-ai/how-to-setup-cuda-and-tensorflow-on-ubuntu-20-04-2022-7d240cffdf1e
[4] The following article is for UBUNTU but contains hints on interesting environment variables for GPU optimization:
https://medium.com/mlearning-ai/how-to-setup-cuda-and-tensorflow-on-ubuntu-20-04-2022-7d240cffdf1e
[5] R. Atienza, “Avanced Deep Learning with Tensorflow 2 and Keras”, 2nd edition, 202, Packt Publishing Ltd., Birmingham, UK (see chapter 2)
[6] K. He, X. Zhang, S. Ren , J. Sun, “Identity Mappings in Deep Residual Networks”, 2016, version 2 arXiv:1603.05027v2